
This piece was inspired by the actual Sanskrit to English Valmiki Ramayan Text that I had got my hands on. Having read about how Sri Ram single handedly eliminated 14,000 Rakshasas and how he eliminated the Lankan Army with the Vanaras, for some reason did not allow me to accept the usual calm peaceful images that we see of him. What I saw in my head was the image of an extreme Warrior honed in Battle, frustrated and angry over the abduction of his Wife. All I could hear him say was..."How Dare you!!!"
So I decided to fashion the body considering a warrior who has spent all his life in Battle, perfecting himself over the years. His clothes had to be simple, like that of a hermit exiled in the forest for 14 years. He wore no armour as he anticipated no war while in exile, so he used his rudraksha beads as basic protection. Adding to all this a layer of dirt and grime from the battle and the lifestyle.
So started this illustration as a simple sketch.

I wanted to show Ram in a really dynamic pose in the midst of Battle, with a War cry and ready to unleash his anger. I also wanted his pose to be in complete balance like that of a dancer with every gesture to be more deliberate than random. I also paid attention to how he would hold his arrow to show a sense of ease and experience in battle. The sketch was followed by a quick color study to understand the general mood of my scene. Base model: I tend to re-use a human base model that I had created in Maya a while ago. This model also has UVs assigned. All I have to do is change the proportions and jump right into sculpting
This base model also has a rough joint skeleton that I used it to change proportions and pose.
From here I take the base model to my sculpting package to lay out the basic anatomy. Since the pose is going to get dynamic and twists the mesh a lot, I dint get into too many details at this point.

All I do is layout my large muscle masses more like pointers/locators for when I sculpt this later. Reposing: I take the base model from here back to Maya. Remember the bone Rig i spoke about?
I use this basic joint rig which is skinned to my character to repose him.
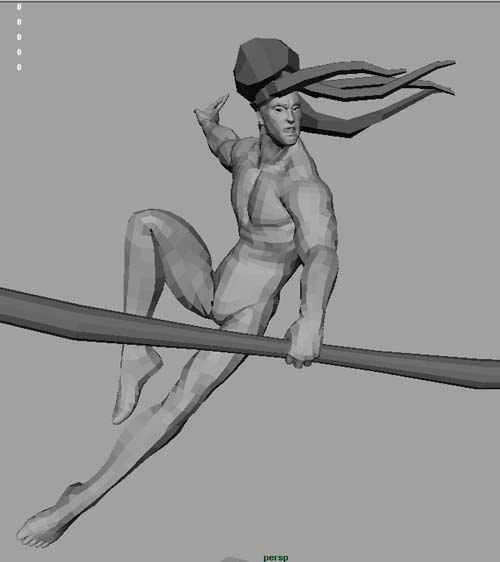
I prefer doing this in Maya as I can always keep going back and forth with my sculpting package to keep tweaking the pose as my bone rig is always available. I try to match my new pose as closely as I can to my sketch. At this point I did realise that a couple of things in my sketch were twisted too far to be allowed in 3d.oops! :)
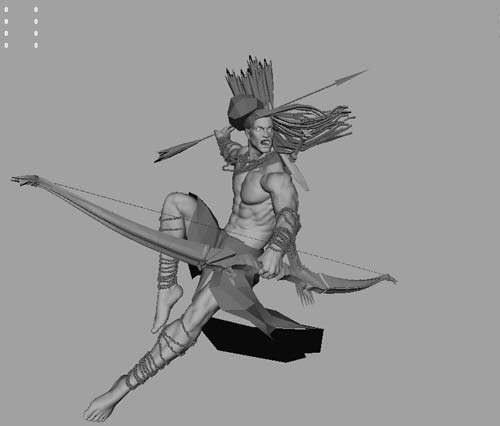
You might also notice that I've added a few accessories to him. This is just to give me a general idea of where things are headed. The final image can be difficult to visualize with a bald Sri Ram!
Once I'm happy with my pose I take this back at level 0 to my sculpting package. As you can see, directly importing it gives me a lot of pinches and bad geometry. This is why I did not detail this too much earlier.

Now onto the Fun part! Sculpting: Each part of the body is now carefully sculpted keeping in mind the general anatomy and also the relation of each muscle with each other when stretched in pose. You can see in the following images that in some casest he muscles are bulged up and in some, they are pulled thin. The two main brushes I used here were the inflate and the clay brush in their default setting. Another important aspect at this point for me was to not make Sri Ram look too young. The myth says that he went to war when he was almost 40 years old, so I had to keep this in mind when sculpting him.(also, that this happened 6-7000 years ago so he didnt look like the 40 year olds now:))
and to sum it all up with all the sculpting, this is what I ended up with for the body.

Accessories:
Once I'm done with the full body, I move onto all the accessories. Again for this I model all the base meshes in Maya over the sculpted model (so that they fit tight!)
All the accessories are then taken into the sculpting package and each of them is detailed just as the body was. Another aspect of the design to notice here would be the fact that he has matted hair. This was based on the reference images of Sanyasis. This seemed to fit well with the fact that Sri Ram was xiled to the forest for 14 years.

Lighting:
The sculpts were then taken over to 3dsmax for lighting and shading.(just cos I suck at maya lighting!)
Before adding any shaders, wanted to get an idea of the general lighting direction. I knew that i wanted the scene to be at dawn so I lit the scene accordingly.4 direct lights for sunlight, couple of omni lights for fill and an hdri.

Texturing: I then added the shaders to each object. For Sri Ram's skin, I used a shader provided by Marc Mordelet for Vray(really good for skin!). I further tweaked this shader for the desired effect. Everything else had fairly standard shaders as I knew I was going to tweak a lot in Photoshop.

The basic render before textures looked like this

Once I had this setup, I started texturing all the objects. this was quite a straightforward 3d painting process, nothing fancy. And as I wasn’t going in for a closeup, this was not that
detailed either.

Once I was done with my main character, I also had to sculpt in certain elements of the background. So from a simple box I sculpted out a rough mountain. I planned to multiply this a couple of times in my scene.

Compositing.
My final render out of Max with all textures looked like this.

To this I added the mountains in the background. The single mountain was given a noise texture and rendered with the same lights as the character. This render was then multiplied to give us this.

I needed Sri Ram's vanar army. So i used the same base mesh and reposed them into 7 guys looking like this. Again rendered with the same light setup and standard shaders.

These 7 guys were allowed to multiply like crazy behind the mountains!:)Couple of these layers were blurred for motion effects. I toned down their lighting as I didn’t want them overpowering the main image.

As mentioned earlier, I found a nice sunrise image to go with this. That was added behind all these layers.

And with everyone jumping in the air, it didn’t make any sense to not have a dust cloud with all that motion. So, I painted and painted and voila!

Hours of color correction, blurring, glowing and all that later......we have our final image!

Blog_ www.markeviv.com

No comments:
Post a Comment